Thursday, January 27, 2022

Basement Expansion Part 19

It's the week before the week before Christmas, and I've got the Tuesday and Wednesday off work to plug away at the basement project.  The first day began bright and early with a delivery of two (2) yards of pea gravel to my driveway. 


It is noteworthy that while Tuesday was a beautiful sunny day, it had rained quite hard for the two previous days. In a way, this was very timely because it provided a nice test of my drainage channels. Standing water made testing the slope, and removing any minor blockages much easier, but also a lot messier.


The area around the sump pump was particularly unpleasant to work in. However, it did become apparent that the pressure treated box around the pump actually slows the pump down a lot. See below for how this problem was solved.


The first order of business was to extend the main drainage channel into the corner where we just got finished with the perimeter.


Once that was done, I installed a couple of inches of pea gravel in the trench and wiggled the pipe around until I had the slope I wanted. The holes you can see in the pipe actually go to the bottom at the final install.


The second section of the pipe was installed in the same way:


On to the sump pump. What I really need is something like the plastic crate below - something like it, but with much smaller holes, because I need to keep the pea gravel away from the pump.
 

The solution was a plastic box which I spent a good twenty minutes riddling with ¼ inch diameter holes. The inlet hole for the primary drainage pipe was cut with a four-inch diameter hole saw which allows three-inch diameter pipe to pass through at an angle. It is hidden in the photo, but I also increased the depth of the sump pit by three (3) inches and then filled that space with pea gravel. The area around the plastic box was also packed with gravel. This was wet, unpleasant work, and Amy Sheep was sadly not on hand to provide any cups of tea or bacon sandwiches.


This is later after the drainage pipe which runs alongside the garage was installed in the trench and connected to the sump pit:


Time to backfill the trenches with more gravel: 


By the end of Tuesday, the far and is completely backfilled...


And the other side is close. I need to build or reconfigure the timber boxes to go on top of the sump pit before I can backfill around the sump pump.


Wednesday morning, and there is a smaller but still significant pile of pea gravel in the driveway.

I got started by modifying the wood box which now stands on top of the plastic sump pit. 


And backfilled with more pea gravel.


The bottom of the sump pit is more than eighteen (18) inches below the top of the concrete floor.

The discharge line terminates in front of the garage. It is angled outwards so that splashing against the vehicle door is minimized.


I had a few barras of gravel left over which I used to fill the low points in the dirt/rock. The gravel was wet when it was spread out. After it dries, I will be monitoring this area for any evidence of water intrusion, at least until after the next rain.  I need to be sure my drainage system is adequate before I cover it with concrete.


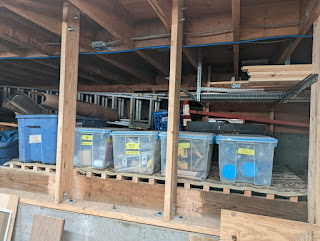
I still had plenty of my day left, so I went back to working on the second storage platform. I had to cut the slats from 2" x 4" lumber with my circular saw because the antique Craftsman table saw I've had for the last fifteen years died halfway through the first slat. I decided to see this as a positive, because now I can scrap the table saw guilt free instead of spending time trying to find an alternative home for it when my cabinet saw arrives.


This is how the platform looks all finished, with carpet installed and the first few boxes in situ. This new found storage space was the excuse I have been looking for to declutter the workshop - this area has been filled with everything that used to be on the original platform or stashed in the part of the basement we have been excavating. 


This is the main shop space after a long overdue cleanup:


This is the other side of the shop. This is still some junk to get rid of from here, but a few hours ago...


...it looked like this:


I moved tut pillar dill into the space the table saw vacated and modified my saw table to temporarily hold the miter saw. 


This is the space where the drill press used to be. I will building a miter saw station in front of the cinder block wall in due course.


This is the trash pile that stared off with the old table saw. This area will obviously have to be emptied out before we can pour concrete. If you're wondering, my sparkly new cabinet saw will be going here once the floor is finished.

Coming soon: Pouring the concrete floor!

Friday, January 21, 2022

Front Porch Part 1

You might assume, if you read this blog regularly, that we have just one project going on at the moment. Well not exactly. We also have/had a brick patio in front of the house which we need to see the back off (and the underneath, etc. etc.). I actually chipped off about six feet of the patio about a year ago, so that we could install our new fence and gates.

Breaking ground, November 2020


Phase #1 complete, January 2021

The reason for returning to this demolition project right now (in DIY time) is that I wanted to throw the broken-up bricks and concrete into the dumpster with all the dirt from the basement. It turns out that this was overly optimistic: we'd have been lucky to get rid of much rubble if we'd ordered two dumpsters. That being said, we wanted the patio to do one, and we had the man and machine on hand.

I found out last time that the patio is just too thick to breakout in one layer. I've got much more jackhammer experience at this point, so I can work more efficiently, but I still had to start by peeling off the top layer of brickwork first.


It quickly became apparent that I wasn't going to have enough buckets to cope with the debris...


I carried on peeling back the brick and tossing the larger chunks onto a tarp next to the patio.


This seemed like a good time to let the jackhammer cool down while I removed one of the porch railings. 


A few waves of the screaming cutting wheel of death, and there it is....gone! 


Back to jackhammering! By now I have got rid of all of the brick layer and have made a decent start on the concrete slab. If you're wondering why I'm working along the outer edge first, it is because that side of the slab is thinner and therefore easier to break up.


This work was not all done in the same day or even the same week, so at the end of each session I had a cleanup and took a photo.


By this point we had accumulated a second (and growing) slag heap in our front yard. Oh well...one more section we won't have to maintain for a while.


Eventually the second railing and the adjacent bush will also be removed...

Fast forward to another sunny evening in December, and I had a bit of time after work to slam on the patio. The session concluded with two small chunks of concrete left to deal with, both of which move...


...and a strip between the entrance walkway and the porch, which I am leaving until last:


The railing in front of the entry door is still clinging on at this point, but the lavender bush has been pulled out like a rotten tooth and the root stamped on.


Next time around I had a full day to work on the patio, and after a slow start I powered through and broke out the remaining concrete:


After cleanup, I cut out the second railing and moved onto the brick steps...


Next target: the brick ribbon at the perimeter of the concrete porch


The last bit would have been the concrete foundation below the brick steps, but it was getting late by this point, so I decided to leave this bit until next time.


After cleaning up all the bits of broken brick and concrete I leveled out the dirt in front of the porch and spread pea gravel over this area - we need something to walk on for the next few weeks, and I happened to have some gravel left over from the other project I have going on.


This is looking towards the gates from in front of the entrance. I put gravel down in the area between what is left of the steps and the entrance walkway.


By now we have a huge slag heap to deal with. There is probably enough material here to fill a 10-yard dumpster without the other massive slag heap next to the driveway...


Future target: 

Monday, January 17, 2022

Basement Expansion Part 18

If you read my last post, you'll be well aware that my blog is running about six weeks behind, mainly because I fell way off schedule when I was making videos of the basement project. The work in this post was done in the two weeks after Thanksgiving. My business is traditionally slower at this time of year which gives me extra time to (literally) chip away at ongoing projects.

You might think, after the last few posts, that we are done with digging out dirt....well not exactly. The perimeter is complete though, so I began on this occasion by installing rebar at the last section of the perimeter foundation.

Once that was done, I built forms for (hopefully) the last time, and sealed them with expandable foam. 

Amy Sheep was not around to help mix concrete, so I had to move on to the next thing....which meant more blinkin' digging!  Obviously we have a sump pump, but under the wettest conditions, which we do get occasionally, water needs to be rapidly directed to the sump pit. In other words, time to dig some drainage channels. The main channel runs inside the perimeter foundation at the long side (27 feet) so I started there. Ultimately I am aiming for a slope of ¼ inch per foot towards the sump pump, but to start with I am just establishing a straight channel.

A second channel runs from the area in front of the concrete stairs, and meets the primary channel at its mid-point. The two junctions are 45 degrees, so I took some measurements and made marks with spray paint before I broke ground. 

The third channel runs along the wall which divides the basement from the garage and runs directly to the sump pit.


After much jackhammering, spading, and wheelbarrowing, all without any assistance from Amy Sheep, the channels were declared complete. 


The timber box that I installed in the original sump pit absolutely forever ago is now visible. I may need to alter the depth of the box once the drain pipes are installed. 


By the time all this was done, a considerable number of days had elapsed, and Amy Sheep was once more available to help mix concrete. It's hard to tell in the next photo, but this is after the concrete has been poured. If you look very carefully you can see water seeping though the pores in the plywood forms.


The photo below was taken a few days later after the concrete has partially cured and the forms have been removed. And just like that, the concrete perimeter is complete!


Keep your browser pointed in this direction to see where the basement expands to next...