Sunday, May 14, 2023

Central Yard Part 8

This post is a compilation of bits and pieces that we have accomplished over the past few weeks; rather like taking a few old dog ends and mixing them together to make a fine Cuban panatela. 

It all starts one Saturday about three weeks ago when we had what we hope will be our last batch of topsoil delivered. What followed was the (by now) usual routine of filling barras and dumping the contents in the yard. 


This was enough to fill up the area at the mailbox side of the walkway...


...including around the irrigation valve boxes...


...top up the section behind the retaining wall...


...and fill out the central area.


Later the same day Amy Sheep and Delilah installed the first batch of plants in front of the house. This area does not have the over-ground irrigation yet, so hand watering is necessary for the time being.


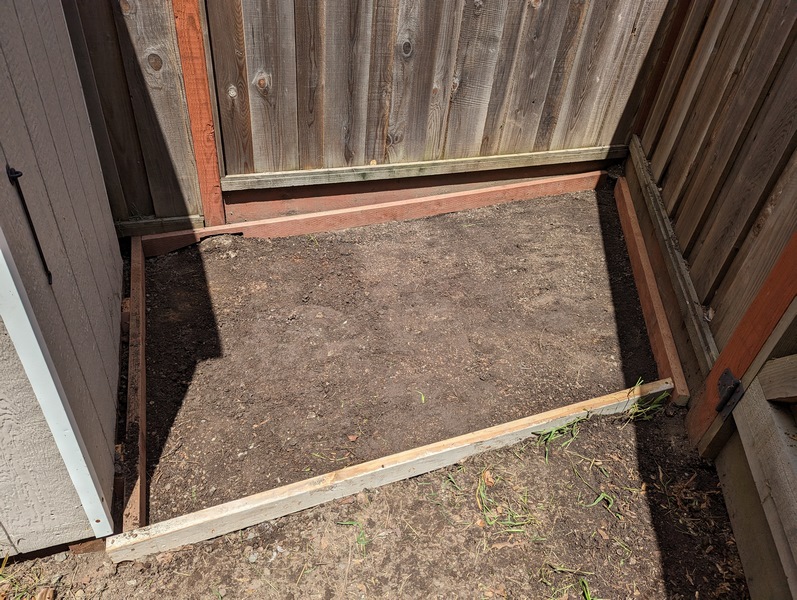
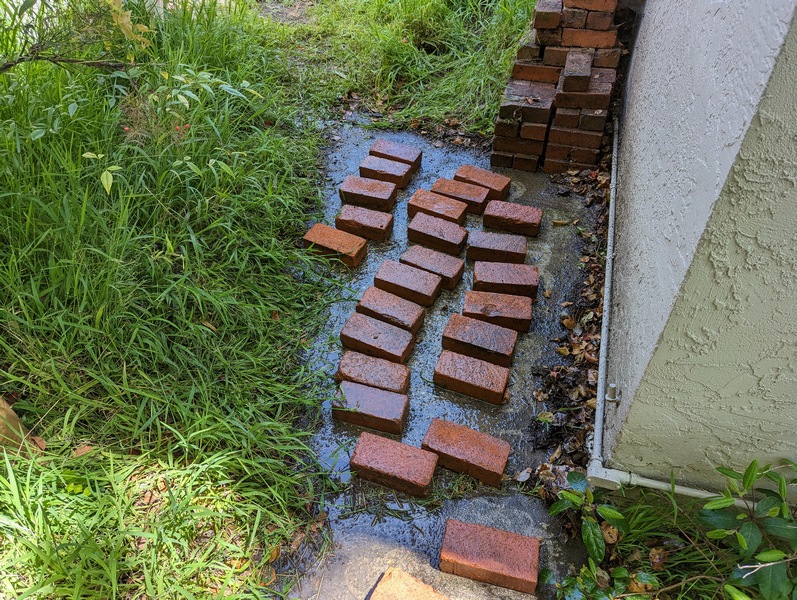
Now that the area between the walkway and the steps which lead to the deck has been levelled out, we want to install an irregular paved pad. We had most of the slabs/paving stones already and managed to buy a few similar ones.


This is the ideal layout after a fair bit of back-and-forth with alternative configurations:


However, before we can properly install the paving, we need to bury the irrigation below this area. This may seem a bit counterintuitive since we just spent ages digging trenches for irrigation, but that was only part of the system.

The underground PVC pipe we previously installed delivers water to the uphill side of each zone. From there a flexible black pipe carries water back across each zone. The black pipe is buried just a couple of inches below the surface so that it can be easily relocated. Narrow "delivery tubes" can be spliced into the black pipe at a later stage; these spurs and subsequent branches can then direct irrigation water to each plant that needs it. The system is designed to conserve water compared to sprinklers which direct water onto walkways, driveways, unplanted areas etc.

We bought a 100 foot roll of pipe and got cracking. I didn't think to get my camera out until we were passing the walkway; this section of the pipe was burred a bit deeper so the walkway foundation can go on top without disturbing the irrigation pipe.


We need a fitting and a pressure regulator to put between the white and black pipe:


We also need a cap for the far end....and we need to do this all again for each of the other zones eventually...


OK, so back to the paving. I began by installing two strips of non-biodegradable bender-board - this is typically used as a boarder for walkways and patios by people who don't mind its plastic appearance. In this case the bender board will not be seen, so it doesn't need visual appeal or have to be perfectly parallel. Both strips were leveled and the secured with some timber pegs which are not visible n the photo. The dirt between the bender boards was dug out to about 1.5 inches below the top edges. 


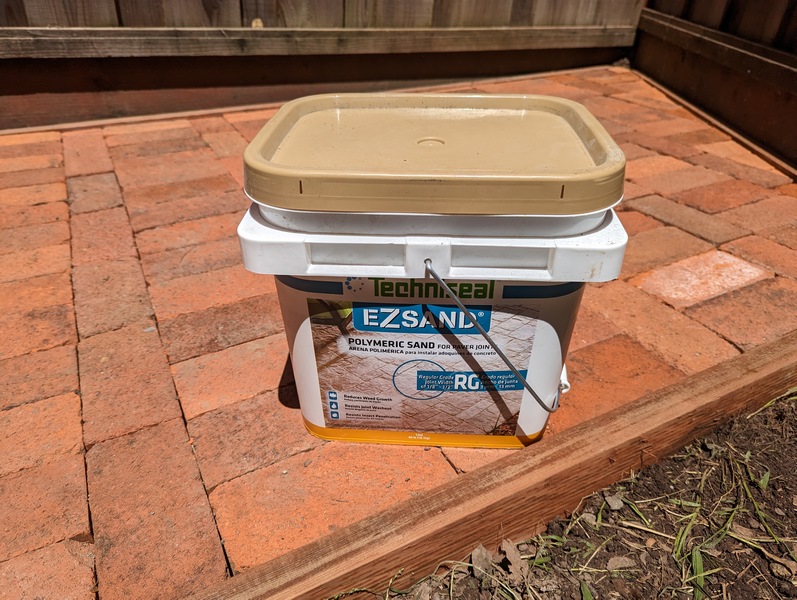
The channel between the boards was filled with levelling sand which was compacted and screeded to the bender boards to give a flat pad:


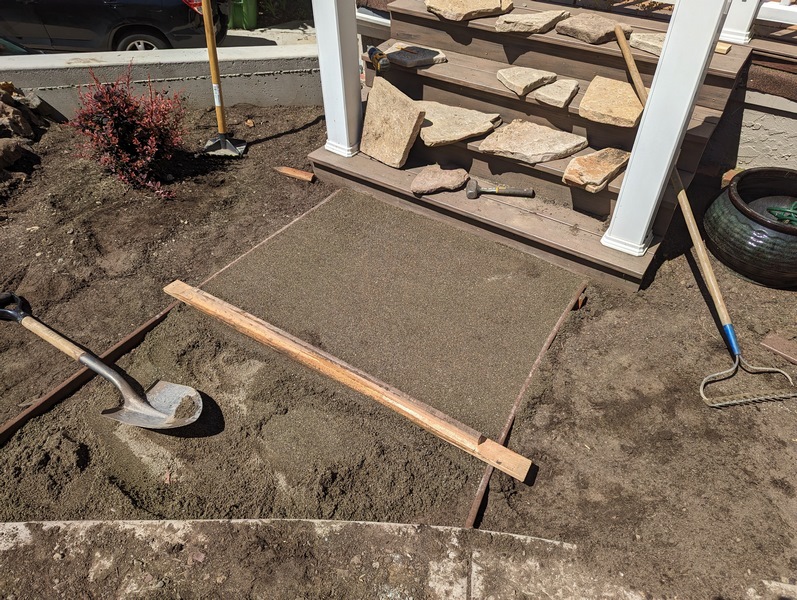
This is after the paving stones have been installed according to the photo above. The slabs were not all the same thickness, which meant removing some sand from below the thicker ones and bit of faffing above, but was ultimately worth it.


This is later after the gaps between the paving stones were filled with topsoil. Amy Sheep will be planting ground cover of some sort in the gaps between the pavers. Stay tuned!

Saturday, May 13, 2023

Miniature Patio

And now, time for a vanity project! We have a space next to our shed where we keep the wheelbarras and dump stuff we don't know what to do with. I keep meaning to tidy it up a bit.


We also have a huge pile of bricks. The light colored ones came from the fireplace in the living area. The red bricks have been harvested from the front patio we destroyed a couple of years ago and from various places in the front yard - for some reason the previous owner thought they made cool landscaping.  


The first step of this mini project was clearing out all the junk and vegetation from this area.


With that done, I could start building the perimeter forms, which are constructed from 2" x 4" PT lumber. The form adjacent to the shed was leveled and is perpendicular to the fence at the rear by design. (The shed is either parallel or perpendicular to the fence depending on your perspective).


I had to notch the rear form to accommodate the fence post foundation. I will have to notch the bricks that go in this area too.


This is with all four forms in place; I ran out of PT so I had to make the front form out of doug fir which I will replace later. 


I used another piece of scrap 2" x 4" to build a screed tool. This helps me set the level of the dirt to 3.5 inches below the perimeter form. I had to remove two barra loads of dirt to achieve this. It does not have to be perfectly flat, just reasonably close.


All done! The pad slopes from right to left, with a consistent slope at the front and back. The shape is a non-parallelogram trapezium (two parallel sides, two 90 degree corners, no line of symmetry). 


I'm using leveling sand for the secondary base. This is a type of sand which has mixed particle size making it easier to compact; it is also known as "concrete sand" or "C-mix" and is not good for mixing mortar. 


I spread the sand out and used a hand compactor to get a solid pad. I then used a second screeding tool to eke out a very flat surface - the compacted sand is set to 2.5 inches below the forms, which is the same thickness as (most of) the bricks I will be installing. I'm starting at the "square" side of the patio so that most of the cutting will be at the end.


This was the point when I realized I was going to have to wash the bricks before I could install them...so I broke out the pressure washer and got going.


I need around 120 bricks, so I had to be systematic about cleaning them and choosing which ones to actually use - some of the bricks were damaged and quite a few had old mortar on both sides. I started washing the bricks in piles to save on bending all the way down...the next photo gives a good contrast between clean and not-so-clean.


I wasn't sure what sort of pattern to go with, but while I was trying out some ideas, I discovered that the bricks were all slightly different sizes...so I decided to break for a mixture of lunch and further consideration.


I ended up sorting the bricks into sizes - basically by comparing every brick with one of more others. Stripes were made from sets of bricks that were the same or nearly the same, and I alternated the orientation of the bricks. Anything more challenging would have been hard to do well.


I settled into a routine of washing bricks, sorting them and then installing them, and thanks to the beautiful sunny-but-not-scorching weather, it was a very pleasant way to spend an afternoon.


I got as far as fashioning the the first two cut bricks before I decided to call it a day - my back was starting to feel the pace and I need to pick up a new blade for the tile saw before I can go any further with the cutting.


The big picture after day one: 


The next morning I came out to find something has been digging in my leveling sand!


I used a mixture of the tile saw, the seven inch blade from the tile saw on my circular saw, and a 4.5 inch blade on my angle grinder to cut the bricks. The bricks are too thick to cut all the way through in one pass with any of these tools; the tile saw cuts wet, which made the process quieter and dust-free, but did not work well for the longer cuts. Ultimately it took the entire morning to cut and install all the odd sized bricks at the rear and at the far end. 


This is after just after lunch when the sun has moved over:


I'm using polymeric sand to fill the joints between the bricks:


Application is a matter of dumping the sand onto the patio and sweeping it back and forth until the gaps between the blocks are all filled up.


After that the excess sand is removed and the patio is washed with a garden hose. Any loose polymeric sand should be removed at this point.


The next day the polymeric sand has fused together (i.e. it made a polymer; scientists call this process curing).  The sand is absolutely rock solid giving the patio the effect of a solid slab. Not one brick wobbles, even under my 200 lbs of talent.


The close-up photo below shows a few details that are worth mentioning. Firstly, gaps less than 1/8 of an inch are difficult to fill. I tried to keep the gaps to an absolute minimum, so this was an issue throughout the patio, and makes the sand filling/sweeping a bit tedious. 

Secondly, chips or imperfections at the bricks also fill with sand which cannot easily be removed, and this includes "pores" at the surface. I was using bricks which are all reclaimed, and in in most cases re-reclaimed. so I'm not worried about a perfect finish. In fact I deliberately picked some chipped bricks out of the pile. I don't think this would be a problem with new bricks or pavers.

Thirdly, I was a bit lax with getting rid of loose polymeric sand at the hose-down stage; this left a few globs of sands that had to be chipped of the bricks with a pocket knife. Next time I would do two hose-down's and sweep between them or use the pressure washer.

You might think this is a lot of effort to go to for a crappy little patio where I keep my wheelbarrows, and it is....but we plan to build a much larger patio behind the house next Summer, and I wanted to practice.