I'm making the doors from solid black walnut - no more veneer!. The frames will be constructed with mortice and tenon joints so they will be super strong. I picked up several 8' lengths of material which was about 2.75" x 0.75". This material is planned very smooth, but of course it is not perfectly straight in either dimension.
I started by cutting the stock into shorter pieces: 24" for the rails, and 18" for the stiles. The finished pieces will be several inches shorter than this. From two 8' boards there was enough material for one extra rail.
The first step of milling the walnut is establishing the face side with the jointer. I could have done this with the full lengths, however using shorter pieces saves a lot of material.

Step two is making the face edge perpendicular to the face side, again using the jointer:
Then it's over to the planer to establish uniform thickness. This turned out to be around 5/8" although its arbitrary.
The boards were next passed through the table saw to bring the width to just above 2.25 inches...
And finally planned down to exactly 2.25:
The milled material should be perfectly flat, square and very smooth.
The rails and stiles were separated, collated, and cut to the final size on the miter saw. The tape helps ensure all pieces are exactly the same length, and helps prevent tear out.
I used this antique marking gauge to scribe for the mortises and tenons.
The tenons were cut entirely on the cabinet saw using the stock miter gauge and were cleaned up with 220 grit sandpaper.
The bulk of the mortices were bored out at the drill press. I spent a few minutes setting up a stop block, and then drilled out as much material as I possibly could with a 3/16" bit.
Cleaning up with a chisel was a bit more challenging. For a start, the smallest chisel I have is 1/4" wide, and the steel blade on all of them is thicker than 3/16".
Grinding wheel to the rescue! I am actually modifying some older chisels, these are not my best tools. I took the 3/4" chisel first and ground the back of the blade down well below 3/16" thickness.
I quenched the chisel every minute or so because overheating the steel will take away its hardness.
The 1/4" chisel was ground down from the sides to be give a blade width just below 3/16". After sharpening on the whetstone I have one 3/4 wide chisel which will comfortably fit inside the mortice, and one smaller chisel I can use to square up the ends.
Which gives this....four times:
After a little bit of tweaking both door frames were dry assembled...
...and glued and clamped overnight:
Next day....quick test fit.
I cut a 1/4" deep by 3/8" wide rabbit at the interior side of each door frame with the router:
The router leaves a rounded corner, which gives a modern "machined" look to the furniture which I don't want....so I squared up each of the eight (8) corners with the same chisels I used for the mortices....this way I didn't have to sharpen anything else!
This is the finished door frame:
The "middle bit" of the doors will consist of a number of vertical slats set inside a narrow frame. Production of the slats started with chopping some more 2.75" x 0.75" walnut into foot-long pieces.
I used a combination of the jointer, the thickness planer and the table saw to mill the slats. The final dimensions are 0.65" by 0.70" where 0.65" is the thickness of the door frame and 0.70" is the width of each slat. The spaces between the slats will be 0.47 inches.
I devised a formula to calculate these numbers:
L - 2(IF) = (x)(S) + (x+1)(G)
where : L = the horizontal width of the opening in the door frame.
IF = the width of the inner frame.
S = the width of one slat.
G = the width of one gap.
x = the number of slats.
I did consider switching to metric for these measurements, but my shop is set up entirely for "standard" so I'm stuck with that. Fortunately the thickness planer is accurate to within five thousands of an inch, so I can easily and quickly produce material of essentially any size.
I cut and fitted an inner frame at each door. The frame is 0.19" in the narrow dimension, and the same thickness as the door frame (0.65") in the perpendicular dimension...which makes it difficult to see in the next picture.
With the inner frame installed, I can establish the precise length of the slats and cut them down.
For manufacturing the spacers I tuned the planer to 0.47" and checked the results with a digital caliper. This is a view of the arrangement from the inside of the door - the rabbit at the perimeter is visible from this side. (Note: the purpose of the rabbit will become clear later).
After checking the fit at both doors, I took each slat out, and sanded all four sides to 400 grit on a flat surface:
Each slat was re-installed with consideration given to which was the best side, and which arrangement looked best next to adjacent slats. The slats and inner frames were numbered to maintain the favored arrangement.
Everything was then removed again, and reassembled with glue between the ends of the slats and the inner frame. Normally I wouldn't stop to take photos during glue up, but I had help this time.
After gluing in all the slats and making sure the gaps were still uniform, I put one pin nail into each slat via the inner frame. This operation is only possible because of the rabbit at the outer frame.
 |
| Always wear your safety specs! |
Once the glue was fully cured I removed the assembled section from the door frame...
...this enables complete access to the edges of the inner frames, and several more 23 gauge pin nails can be added from both ends:
This is the "finished" door from the front after the slats have been re-installed and secured to the outer frame with more pin nails.
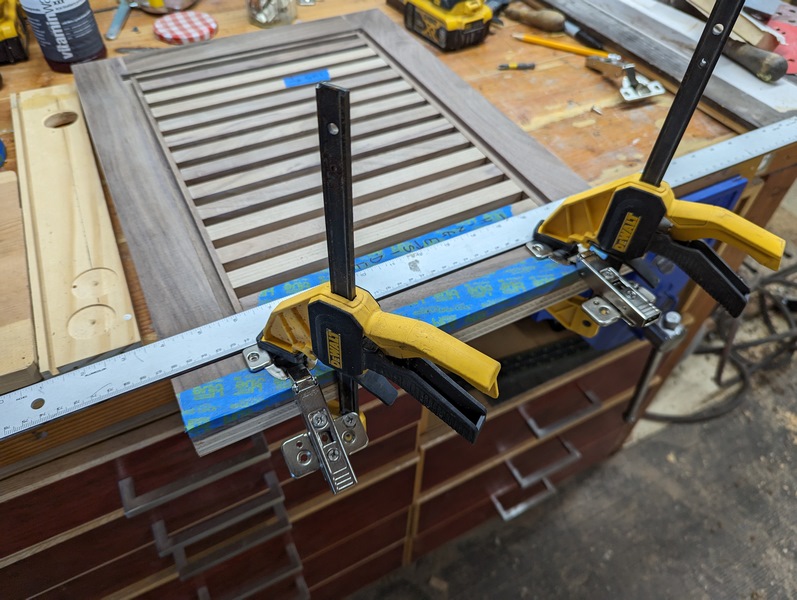
The next step was to install the doors at the cabinet. I'm using European style full overlay hinges from Blum/Rockler. The key to a successful install is drilling the 35 mm/1 3/8" diameter hole for the hinge cup in the correct place. I was apprehensive about this step, so I took plenty of time and made sure to triple check my measurements. The hole center is 22.5 mm from the edge of the door, so I set up a stop on the drill press to achieve this amount exactly:
I set the depth on the drill press to 0.5" which turned out to be perfect:
After drilling both holes, the hinges were aligned and clamped, and screw holes were bored with a centering drill.
This is after the door has been hung at the cabinet. The blue tape is useful for making detailed pencil marks which I won't have to sand off later.
The second door was installed the same way but much more quickly.
By now the cabinet is close to complete. One outstanding item was the holes at the back panel where power cords etc. will pass through. The diameter of the holes is known, so I can calculate the circumference and cut strips of veneer to this length. I tried wrapping the veneer around a Forstner bit to induce a curve.
I couldn't iron on the veneer, so I used a heat gun to melt the glue and then pressed it on by hand while wearing an oven glove.
This is after trimming with a chisel, sanding, wood filler, and more sanding to 400 grit. After this it was a case of doing the same at the cabinet, inside and out, and at both doors. Not to mention rinse and repeat....
The last step before applying the finish is to drill pilot holes for the legs. We actually bought the legs over a year ago, and I installed them on our "temporary" TV cabinet to make sure they would look ok. Each leg is attached with four (4) screws. I used a scrap of 1/4 inch plywood to make a template, and then bored shallow 11/64" holes in each corner of the underside of the cabinet.
Finally, time to apply the finish! We have been looking for an alternative to polyurethane for finishing furniture. This
video is an excellent resource, and ultimately led us to going with
Odies hard wax oil. This is a combination of wax and oil that was originally designed for use on hardwood flooring. It is super easy to apply and gives an amazing result.
Odie's is a food grade wax which can be used for items like cutting boards and has a citrus odor.
Since the cabinet was already upside down, I started by applying the Odies wax to the base of the cabinet. Application consists of wiping on a small amount of the wax with a paper towel and then leaving it to absorb for a couple of hours. After this time the excess can be rubbed off with a soft cloth or an old t-shirt. The base came out great, so I followed up by installing the legs and turning the cabinet the right way up.
This is how the inside of one of the doors looks after Odies wax has been applied and buffed out:
The door is actually not finished - I am installing speaker cabinet-style brown mesh fabric at the inside of the doors. This is mainly to keep dust out of the cabinet but also prevents LEDs inside the cabinet from shining between the slats/being visible in the living room. I manufactured some walnut strips which will be installed in the rabbits at the interior side of the doors.
Test install - the strips are by design a very tight fit and I had to use a dental pick to get them out of the door. Once released, all the strips were finished with Odies wax.
An appropriately sized piece of fabric was pressed with a hot iron and then laid over the inside of the door.
The top retaining strip was added first - I had to use a thin piece of dowel as a spacer so I could hammer the walnut strip into place:
Bottom strip next....
The two side strips were added last. With everything hammered home, and the fabric adequately taught, a series of pin nails were fired through the strips and into the bulk of the door.
Excess fabric was trimmed with a sharp razor blade:
....and both doors were re-installed at the cabinet:
This is the look with the doors closed. I am still waiting for the door knobs/pulls to arrive...if I had a lathe, I could make my own, but that particular tool is still on the wish list. I also have to wait up to twenty-one (21) days for the Odies wax to fully cure.
Stand by for post-installation pictures!


%20%5B800x600%5D.jpg)