Showing posts with label driveway. Show all posts

Saturday, July 12, 2025

Mailbox Again

I installed our mailbox back in March 2023. It came out about six (6) inches lower than I intended, but otherwise it was super smart:


The timber post was set in a MASSIVE concrete cylinder. I said at the time that I wanted the mailbox to win if it came into contact with a vehicle. About six months later, the clash was called a draw. The post was destroyed, the four bolts which held the mailbox to the post were sheared off and the box ended up fifteen feet away in the driveway:


The car took some serious damage too. The front spoiler and grille were destroyed, the fender and hood were dented, the headlight array needs replacement and the passenger tie rod and/or ball joint or maybe the suspension was broken. I'll take that.


I put up a temporary mailbox the next day. This one was neither secure nor plumb:


A bit later I cut off the above-ground section of the post which took a surprising amount of effort and several cutting discs:


And that was as far as I got for more than a year. Although I had a replacement mailbox and post in my garage for all that time, I just could not quite get around to installing them. Until the day before independence day and I was off work and at a loose end. It helped that the weather was a very pleasant 65F/17C and, even better, Samuel Sheep was on hand to help.


We started by digging a hole next to the existing concrete, which will be staying where it is. We had one guy jackhammering, followed by one guy shoveling loose dirt into the wheelbarrow. This means that if anyone observes us there will always be one guy working and one guy watching; this is standard union operating procedure in the construction industry in the USA. If you have a three person crew, two of them have to watch, and if you have four guys, three must watch, etc. On the larger crews it is customary for observers to form a circle around the worker.


The hole has a depth of twenty-four (24) inches and a diameter of less than a foot, so it is considerably smaller than last time.  We set a 4" x 4" redwood post in the hole and secured it with some bracing. This was much easier to do with two people. 


We mixed up two full bags and one open bag of concrete in the wheelbarrow and poured it into the abyss. It wasn't worth getting the concrete mixer out for a small job like this. 


We took a quick tea break, and then we came back out and filled in the rest of the crater with dirt and replanted the grass we had to temporarily remove:


The next day I was on my own. I removed the bracing, marked the post at 42 inches above grade, and cut off the excess with a circular saw. 


After that I installed the steel sleeve over the post and secured the mailbox. At the time of writing it is has survived over a week of exposure to traffic.

Friday, December 30, 2022

Sump Pump Redirection

The sump pump that we installed in the newest part of our basement has been working very well over the last year or so. The only slight issue is that the discharge line was never properly finished because we were waiting for our new driveway.  This is how the exterior portion of the pipe looked a few months ago:


The interior section wasn't much prettier:

I thought I could do a bit better. The primary target is to have as little pipe visible at the exterior as possible, which basically means making the exit hole low to the ground instead of just routing the pipe through the ventilation opening. The foundation is in the way in the basement, but in the garage there is no such issue. 

I started by boring a hole through the wall between the garage and the basement:


The hole at the garage exterior wall was much more difficult. I destroyed at least two hole saws trying to bore through the stucco before I switched over to a small cold chisel.


Once the holes were bored, I went back into the basement and disconnected the existing discharge pipe. There was a tiny amount of gravel at the bottom of the sump pit which I removed.


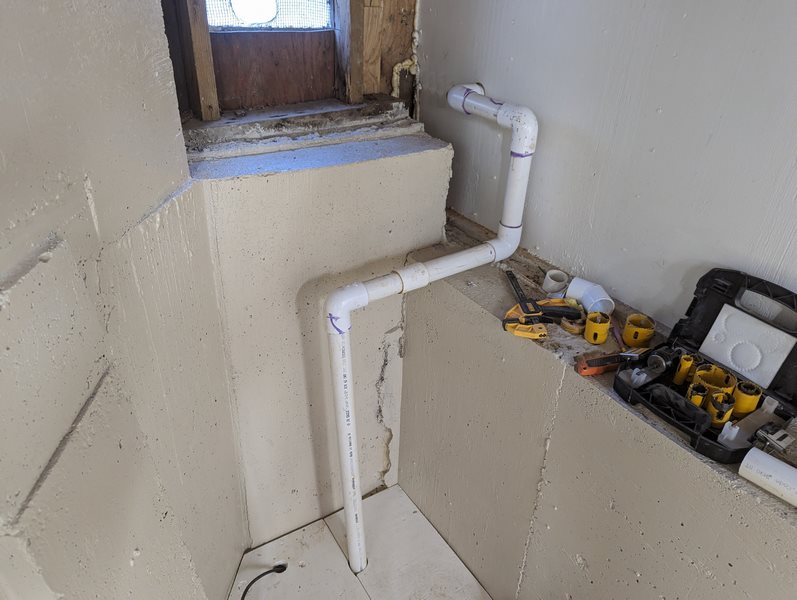
Reconfigured the discharge line inside the basement to pass through the wall into the garage:


I bored the hole at the garage side of the wall with a slightly larger hole saw so that the elbow fitting would pass inside and the pipe can be flush with the wall. 


Extended the pipe to the exterior...


...where it terminates adjacent to the new drainage channel:

Monday, December 19, 2022

Driveway Remodel Part 5

The final part of this long-running project is the walkway from the street to the house. I dug out the old walkway a while ago. We used to call it the "path to nowhere" because we never walked on it.  


This is the layout for the new path which leads from the driveway/street....

...to the porch...


...and on to the gates which lead to the part or the yard where the raised beds are located:


This is quite a bit later after the forms have been constructed and the rebar installed:


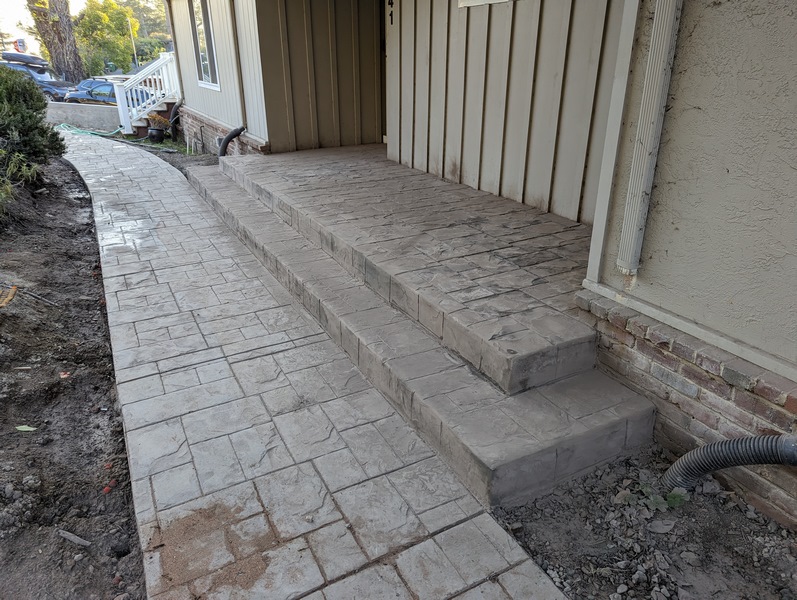
I was at work during the pour, so I don't have any in-progress photos. These pictures were taken in the late afternoon after the concrete has been stamped with a slate pattern. This helps differentiate the path from the other vast swathes of concrete.


We have some regrading to do between the path and the retaining wall that will have to wait until the new year.


The very last thing is the porch which we modified ourselves a while back. 


The original plan was to cover the porch with paving stones, and also to pave the entrance walkway....but we didn't have the budget after paying for the retaining wall and the new driveway. 

Instead we had the porch covered with a thin layer of mortar-like material and then stamped with the same slate pattern as the walkway. The photos below were taken just after it was finished. We have to wait three days before we can clean off the powdery release agent, and then in a few weeks we can apply sealer to the porch and the walkway.


Friday, December 16, 2022

Drainge Woes

We've had problems with drainage in front of and down the side of the garage in the past. The first step to solving this problem was the drainage channel we had installed as part of the new driveway. The channel is connected, below the concrete driveway, to the section of white PVC pipe which runs at the left side of the garage.


So far so good....the problem is that the older black pipe which runs beyond the new section is completely blocked with dirt. Obviously I didn't know exactly how much dirt or how far it extends into the system...but I needed to find out, and remove it. I started by digging out as much dirt from above and around the pipe as I could, and removing both the downspouts that feed into the pipe:  

The openings in the pipe, where the downspouts were connected were completely filled with dirt:

As was the pipe:


Tree roots were growing through some sections:


It was pretty clear none of the old pipe would be going back, so I decided to remove all of it. The section which passes below the gate was very difficult to get out. I had to make a number of cuts and then hammer out the small bit that passes immediately under the gate. The gate post actually stands on the edge of the garage foundation so it didn't move fortunately. 
. 

There was another big root in the area below the pipe:


I got rid of all the old pipe up to where is disappears under the patio. One day we will replace the patio, but that is not part of the plan for right now, so this section of the drainage pipe will be staying. I cleaned the dirt out of the first six inches with a crowbar: 


The next downspout along is located at the opposite side of the patio. I discovered that the pipe in this area is totally clear by stuffing my hand inside. The pipe is a lot deeper below the surface in this area too which makes sense.


I used a combination of the high pressure hose and my hands to clean out the section of pipe which passes between this downspout and the edge of the patio, and then I cut the pipe back and prepped it for connection to the replacement pipe.


Dug out all the excess dirt and tree roots from the channel between the house and the walkway:


Including below the gate...


OK, time to move on to the next problem. The downspout at the left side of the garage used to plumb into the old drainage channel. It doesn't do that anymore because the new driveway is in the way (see below). There are a number of potential solutions to this issue, including adding an extension which directs water into the drainage channel. However, with a little bit of work, I think I can move the downspout around the corner and plumb it into the subsurface drain.


Started by cutting back the new pipe and preparing it for connection to a T-piece:


Connected a T-piece where I want the new downspout to plumb in, and added the first section of new pipe:


I'm installing a catch basin straight after the gate. I have to dig out a bit more dirt below the basin. I would have liked to put it right at the beginning of the line, but the gap between the foundation and the walkway is too narrow in that area.


I installed a second catch basin just before the patio. This is the second line of defense!


Re-installed and connected both of the existing downspouts:


The gutters at this part of the roof are the type which are rolled-on-site, which means they are all one piece, including the 90 degree corner. This makes modifications to the downspout locations more difficult than it would be with sectional gutters. My work around is to use a pre-made downspout connecter and a flat sheet of galvanized steel and adapt them. I already put a couple of folds in the steel sheet by putting it in the vice and applying a hammer before I took the photo below.


I removed the downspout and the adapter which leaves a two inch diameter hole in the gutter:


Test fitted my patch...


I installed the patch with a mixture of pop rivets and an excessive amount of silicon caulk:


I modified the downspout connecter and installed it in the same way as the patch after cutting a hole in the gutter in the place where I want the new downspout to be:


Installed the old downspout in the new location. I'll have to paint the replacement securing straps at some point, and the bit of the front-facing wall where the downspout was originally located.


Time to backfill around my new drainage pipe...


The next bit is finalizing the drainage channel in front of the garage. We bought some very smart cast iron grates, but I also wanted to install some fine wire mesh first since the grates will not keep out small leaves. The mesh comes on a roll and I cut it into strips with the metal shears:


The grates come in eighteen inch sections which I placed on top of the mesh:


All done! Just need some rain now to test my work....