Showing posts with label plumbing. Show all posts

Sunday, March 29, 2026

En Suite Bathroom Sink

I don't know if you are aware, but if you're talking about a house, nobody says "master bedroom" or "master bathroom" anymore. Or even master suite come to that. Modern alternatives to "master" in this context are "primary" or "principal." Sadly, neither of these terms are adequate for the pokey bathroom in my house, so I'm going with "en suite" as the descriptor. We partially remodeled this bathroom about three years ago, and it has done ok with one small issue:

Unless you have the eyesight of Veronica Seider, you might need to view the close up:


There was really no practical way to replace just the sink, even if we could have found an identical replacement, so we bought a pre-assembled sink/countertop that is almost the exact same size, but has a slightly larger bowl volume - and looks a bit more modern although that wasn't the primary consideration. 

The weekend after the new sink was delivered, I just happened to be alone due to a combination of Spring break and work schedules, so it was a perfect time to put one of the bathrooms out of service. As I mentioned above, we replaced the countertop a few years ago, and it was installed from the top down, so there was no easy way to remove anything. After disconnecting the plumbing and removing the faucet I broke out the sink with a claw hammer. To be honest, the hammer was overkill. 


Obviously, I did not accomplish this entirely alone; even breaking up a sink requires a work crew standing by to observe in order to comply with Union rules. 


I was able to lever the backsplash and sidesplash off the wall without breaking them or busting up too much of the drywall. 


Getting rid of the stone countertop without doing any damage to the cabinet was a tough assignment. I had to cut the countertop and the supporting plywood panel into several pieces to achieve this, which made an awful lot of dust. Bare vanity cabinet after cleanup: 


Before I can mount the new sink, I need to replace the plywood panel. The whole point of the panel is to provide structural integrity to the cabinet. 


The panel would normally go over the cabinet and thus raise the height of the unit by the thickness of the panel....which is 3/4 of an inch in this case. However, the replacement sink is exactly 3/4" thicker at the perimeter than the original. I want to maintain the original height because there is very limited space below the wall cabinet for the outlet:


The solution is to set the new panel inside the cabinet - i.e. flush with the existing top edge. The easiest way to achieve this is to clamp the panel where I want it to go and secure it with pocket screws:


Even with help from my willing assistant, I wasn't able to set the sink....


....until Samuel Sheep came by the next day and provided the necessary muscle:


So, here's the thing: The new sink comes with a backsplash, but not a sidesplash....so, I decided to re-use the originals since I removed them intact. The only hinderance to this plan was one of size: the original pieces were a bit too long:


If I had taken measurements in advance, I could have placed the sink a little bit further from the wall and it would have been a perfect fit. Oops! I also could have ignored the overhang....but I just didn't want to. I ended up trimming the sidesplash with the same diamond encrusted screaming wheel of death that I used to cut up the original countertop. I did this bit of cutting in the workshop since I already de-dusted the bathroom once. I also re-installed and reconnected the faucet.


The original drain fitting was too small for this sink, so I need to find a replacement before operation can be restored:

Friday, August 12, 2022

Widening The Pathway part two

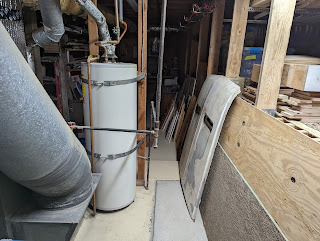
As documented here, after moving the water heater, the bottle neck in the workshop is the ridiculous gas line:

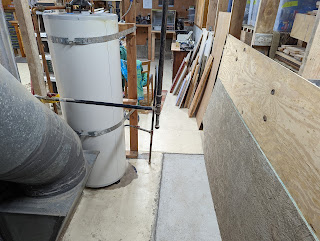
Safety first: after shutting the gas off at the meter, I lit one of the burners at kitchen stove and used up the residual gas in the pipes....and proved the supply was really off. Then I disconnected the flexible lines at the furnace and water heater; both the flexible lines are new and can be re-used. Building code in California requires at least eighteen (18) inches of flexible pipe adjacent to every appliance and there is a good reason for this.* 


I considered cutting out the old pipe with the screaming wheel of death, but it was safer just to unscrew it back to the T-piece. I actually started this project on a Friday morning before a weekend when Amy Sheep and the three little sheep were elsewhere - my thinking was that if I screwed up, I would have three days to get professional help!


Obviously I planned in advance which fittings to buy, but I was still a bit nervous about installing them correctly and getting the aligned where I wanted. 


I put a temporary strap on the horizontal section; the finished pipe will stand on the floor and make the strap redundant.


Like so, as they used to say on Blue Peter:


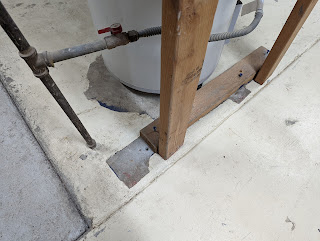
The pipe came out a quarter of an inch short, so I shimmed it with a a scrap of wood. I might make a more aesthetically pleasing spacer in the future.


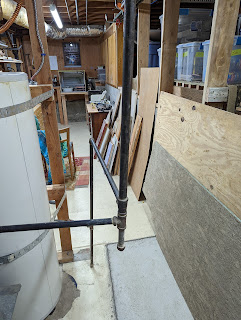
This is later after I attached the two independent spurs which go to the appliances. This photo was taken before I was done pressure testing the system; once that was done, I reconnected the gas supply at the meter and reignited the pilot flame at the water heater. The furnace is electronic ignition, but we only need that a couple of months of the year at the most, so I typically leave it off. 


Much better! You could fit a double decker bus through there now:

*It's called earthquakes....

Sunday, July 31, 2022

Widening The Pathway part one

It's a first world problem, but the bottleneck in my basement/workshop space is the narrow gap between the cinderblock retaining wall and the gas line which serves the water heater and the furnace. Obviously it doesn't help that half of the space available is taken up with some sheets of plywood and a spare hood for the '68 that has been sat in one place or another for the last ten years.


This is the same space a few hours later after I hoiked the hood into the other half of the basement and relocated the water heater.


As you can see from the concrete floor, I only moved the water heater six inches, so the plumbing modifications were minimal, and I didn't have to empty the tank completely - I drained about two gallons and then used my body mass to reposition the tank. I had to move the blocking as well, but that was pretty easy, and I reused the original fasteners. The water heater was still working after this little exercise, you'll be glad to hear.


Now the gas supply line really is IN THE WAY! Stay tuned to see how this problem is solved!

Monday, June 27, 2022

Hose Bibs

A few weeks ago, I destroyed the hose bib that passed through the area that is now occupied by our front porch. Amy Sheep has been struggling to water some parts of the yard ever since.....

So....time to do something about that! I started off by attaching a new lead-free brass bib to a copper compression fitting (don't forget the thread sealer!) and then soldering that to an overlong section of copper pipe. I need four of these in total, but I just made one to begin with and then went into production later. I've actually never "sweated pipe" before, so it was fun to learn something new. 

The next step was to drill a one inch diameter hole in the wall. The pipe passes through brickwork at the exterior and the rim joist at the basement side, so I had to use a mixture of drill bits. i.e., 3/16 long series masonry all the way through from the outside, then expand the hole in the brick to one-inch from the exterior, and then come back the other way with a one-inch spade bit. The pipe is 3/4 inch internal diameter, so I have a bit of wiggle room. This is the view from the outside with the hose bib in place:

At the basement side, the copper pipe has been trimmed and connected to a new PEX supply line with a push-on brass 90-degree Sharkbite fitting. I used these fittings for all of the copper/PEX and PEX/PEX junctions. The brass clamp in the background is screwed into the rim joist and is designed to stop the hose bib from rotating.

I also installed a pipe which will serve the irrigation system in the front section of the yard. PEX pipe is light sensitive, so this section had to be made from copper. I sweated these joints since I don't want them to rotate like the push-on fittings do. 

I installed two hose bibs at the front of the house, either side of the irrigation line. Later I will install a third next to the garage and a fourth at the interior of the basement close to the sump pump. The plywood paneling that I installed in the basement a few weeks ago was primed and painted before the plumbing lines were installed. 

The opening you can see at the right side of the photo above is an access panel for the electrical junction boxes that I will be installing - this area needs lights, outlets and a 220 V connection for the cabinet saw. This is also where the cables that serve the exterior outlet and the streetlamp pass through the exterior wall.


Sam helped with the painting, and we did the wall between the basement and the garage at the same time:


This is the connection to the exiting plumbing line. The plywood shear wall is much stronger with the pipe passing through it than it would have been if I installed the plywood around the pipe.

That's all for now...

Thursday, November 22, 2018

A Bigger Space and a Bigger Sink

I was very happy with my workshop, but there still scope for improvement. This is how the workshop sink area looked a few weeks after we moved in -  cabinets in an "L" shape and the fluorescent lights still shining bright.


Fast forward about a year, and the new LED lighting and electrical outlets have been installed. I also built a mobile work table for projects that need more space. I wanted to change around the counter at the left of the sink to make a larger space in the main workshop area.


Started by disconnecting the old two-bowl enamel/cast iron sink. There wasn't really anything wrong with it, but the double bowl did not lend itself to cleaning our large paint roller tray!


Then removed the "L"-shaped counter top.


This is where it got a little bit trickier. I had to take the short piece of the "L" and reduce it from three cabinets wide to two and then re-install it.


Re-installed the long section of the contertop and then mitered the short section to fit next to it while retaining all the edging. It was about 3/4 of an inch shorter than would have been ideal.


I had to fill the notch with a tiny off-cut.


Test fitted the sink - I deliberately bought a replacement of the same size so it dropped straight in to the original opening. Then I took it back out and installed it with the proper caulking and fasteners.


Installed the sink drain and faucet.


Connected the existing supply and waste lines to my new sink. This was actually really easy, even though I've never done glue-together plumbing before.


A very adequate outcome: