Saturday, December 18, 2021

Basement Expansion Part 12 point five

I mentioned a few posts ago that we had settled into a routine of digging and then pouring sections of the perimeter. I don't think I explained what we have been doing with the dirt. The answer is that since we filled up the first ten cubic yard dumpster, most of the dirt we've removed has been dumped in the front yard. This has a couple of disadvantages: ultimately this dirt will have to be moved again when we do get a dumpster, and our front yard is now overflowing with small pieces of rock. You might think this meant we needed another dumpster, but I had what I though was a better idea.

An idea that consisted of piling dirt into buckets and...
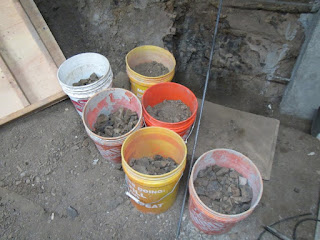

...tossing it into the huge void below the entry porch:


Several sections of the perimeter were thus constructed:


In spite of our plan to attack the perimeter from both sides, we never did pour two sections on the same weekend - pouring one section was quite an effort. Instead, I devoted any leftover energy to working on the floor. This process consists of carving out sections of the dirt, constructing perimeter forms, and installing rebar....


Before adding concrete and working it over a number of times to get a flat finish (I wont say mirrored finish!). 

There are several reasons why we are pouring the floor in sections instead of a monolithic slab like Odell would do. Obviously we don't have a concrete truck, a pump and a four man person crew, but also this allows us to pour slabs without control joints: the junctions between the sections fulfill this requirement. I'm using a half-inch round-over trowel at the perimeter of each section, so this leaves a deep grove at the junctions.


Quite a bit of thought went into the placement of the "grooves" because I want the finished look to be visually appealing. The plan is for the 32 inch wide section shown above to extend up to the garage doorway and form a pathway, and for the perpendicular joints to align with the pre-existing shelves. This leads to a 3x3 array where the bottom left section is occupied by the chimney, and the path above extends across the top right and middle right segments: 


Once the forms were built and leveled, I installed rebar and applied bonding agent to any bits of older adjacent concrete. The rebar extends through the timber forms so that it can the connected to the next section of the slab in due course.


The way the forms were constructed means that the timber occupies space in an adjacent section - in other words, I couldn't pour concrete in two adjacent areas at the same time.


After spending quite a while on setup, I was able, with help from Amy Sheep, to pour three sections of the floor in one go.


It's a bit more obvious which sections in the photo below, which was taken after the concrete has mostly cured:


To be continued....

Monday, December 13, 2021

Basement Expansion Part 12

Time to pour the floor. Well, a bit of it. I was working on my own on this particular Saturday since Amy Sheep was taking a much needed breather on a beach somewhere. Mixing enough concrete for a section of the perimeter on my own was not really an option, so I decided to start with the floor. More specifically, the two (2) foot wide strip which runs adjacent to the cinder block wall/storage platform.


I started by removing the carpet and raking out all the loose dirt. This left an area that was about four (4) inches deeper than the adjacent concrete floor.


I gave the area a gentle once over with the jackhammer, and increased the depth by another couple of inches. I probably don't need a six inch slab, but this section is the main thoroughfare, and I would rather it is over engineered than not.


I only had to build a form at one end, and the rebar was doweled into the existing floor and into the footing at the wall. Super quick and easy!


I snapped a red chalk line at the wall to help me get the concrete to the correct height.


When Amy Sheep and I mix concrete together we cut the bags as we need them, but I thought I would prepare ahead this time since I was on my own. It is much easier to lift and pour a 40 pound bag into the mixer than an 80 lb bag. 


I hosed down the target area, and then I went for it.


I've never poured concrete which needs to be good enough to look at on this scale before, although I did get started "in the biz" when I was very young. When I was around six years old actually, while I was spending a glorious week at my Grandparents house. One morning over breakfast I was informed that Grandad and I had "some cementing" to do. Wow! This was exciting news! The nearest I had previously been to real, proper sand and cement was on the pages of What Do People Do All Day.

The adventure began in my Grandfather's garage which was, on the outside at least, a very small single width detached structure with a lean-to greenhouse at the right side. When his car was in the garage you could only just open the doors, but when the car was on the driveway the garage became an Aladdin's cave of tools, wood working equipment, partly completed projects and my Grandfathers collection of antique keys. 

The garage had heavily worn herringbone flooring and smelled of old wood. I stood at the entrance scanning the interior, trying to imagine what was inside all the toolboxes and cabinets, while Grandad looked through boxes and drawers in search of his masonry trowel. This went on for probably ten minutes while Grandad muttered the occasional inaudible comment. Eventually he discovered the trowel in a plastic carrier bag down the side of the bench, and, to his dismay, it was caked in dried-on mortar. Grandad held the trowel in front of me and decreed, as only he could: "Don't ever let your children borrow your tools!" 

I must admit that I was more concerned with the potential cancelation of the cementing project due to a lack of available tools, but I should have known better. Grandad had a table-mounted circular saw which was probably the most dangerous use of a circular blade ever, but was also, I discovered, prefect for chipping mortar off a trowel. Looking back on this now, I have to assume that the saw blade was sacrificed so that my morning entertainment could proceed.

Larking around in my Grandfather's backyard, summer 1975

This is the look after I worked over the slab several times with the finishing trowel:


The photo below was taken the next day. I think I worked the concrete over four of five times at about 30 minute intervals. I'm super happy with it. Everything I know about concrete has been learned from my Grandfather and from the folks at Odell Complete Concrete.


Stay tuned while we cover everything we own in hazelnuts, sultanas  and thick, thick concrete...

Wednesday, December 8, 2021

Basement Expansion Part 11

This post takes a couple of diversions from the main purpose of the project (i.e. making the usable basement space bigger). The first deviation is storage space, so it's kind of related. The photo below, which has made several appearances in this blog, shows a storage platform which has been strung between the cinder block wall and adjacent foundation pier - all you can really see is a cardboard box at the front of this area. I wanted to keep this space for storage, but it has always irritated me that the platform was not even close to level.


This is how this area looks after I removed the timber slats which make up the platform and leveled out the dirt.


I then added a 2" x 6" strip of timber on top of the cinder block wall, and poured an equivalent concrete strip at the opposite side. The platform will be constructed from slats between these areas which will be level.
 

The other deviation is actually an improvement to the structure of the building which I hope will be significant. The cinder block wall which I keep referring to has actually moved/bowed about one quarter of an inch (8mm in European Union speak) since we bought the house four-ish years ago. That's not a big deal at this point, but it could become one. My solution is to install a series of 2" x 6" braces between the top of the wall and the floor joists. 


The braces are connected to the wall with ½ inch diameter 6 inch concrete anchors (Tapcon™ bolts in other words) at both sides, and the L-brackets are bolted through the braces. It is obscured it the photo below, but the voids in the cinder blocks have been filled with concrete so I have solid material to connect to.


Connections to the floor joists are made with a pair of ½ inch diameter bolts:


This is the almost-finished platform with some boxes piled up to test the strength of the slats. The steps I constructed a couple of weeks ago will make it easier to access this area.


To be continued.....

Friday, December 3, 2021

Basement Expansion Part 10

At this point the project has settled into a cycle of digging out the next section of the perimeter, installing rebar, building forms, and pouring concrete. Rinse and repeat. We can only pour about forty (40) inches of perimeter at a time, so to speed up this process, we needed to work a night shift attack from both ends.

This is the view at the other end of the basement looking towards the workshop. At the center of this area is a cinder block retaining wall which the pervious owner of the house did not complete - the footing extends into the foreground in the photo below. To the right is the foundation which supports the front entrance porch. This section of the concrete has been braced with timber at some point in the past because it leans. I don't want to disturb the porch foundation or the cinder block wall, so I have to figure out how to fill-in the gaps and join these areas to the new foundation.


This is sometime later after I dug out the dirt/rock below and behind the porch foundation and poured a new bench foundation to support the porch. 


The rebar that protrudes from the new concrete will join up with the rest of the new bench foundation later. This is how it looks after the rebar was trimmed and capped off with some scrap lumber - safety first!


Top marks if you predicted what comes next. If you didn't, the answer is stairs. The forms for the risers were constructed from nominal 2" x 8" doug fir, so they are actually 7½ inches high. The cinder blocks are 7¾, so there was a bit of fudging going on, but I did make sure that all the steps are level left-to-right.


I installed the rebar intro the new concrete, and did my best to attach it to the cinder blocks.
 

Just add concrete...


And there you have it, a set of stairs:


Tune in again next tine to see where the staircase leads to...

Saturday, November 27, 2021

Basement Expansion Part 9

This gestation period for this post has set a new record, even for this blog, and I'm only writing it now because I'm on vacation from work/real life for a few days over Thanksgiving. I had planned to make the basement project Video Only, but for now that format has suffered a Twickenham Studios-style abandonment due to the following:

1. Setting up the camera and keeping on top of batteries, memory cards and decent camera angles slows down the project.
2. Editing the videos takes a lot of time.
3. A lot of the content is the same...
4. The time lag between doing the work and editing the videos means I'm bored with the content by the time I'm watching it back.
5. Surely that's enough...

Therefore, the next few sections probably the rest of this story will be told with stills which have been pilfered from unpublished videos, or snapped with my trusty canon powershot™.

So, with all that out of the way, what's been happenin' with the basement? This is the scene at the end of the last video; in real time this was the end of March 2021. We are usually done with wet weather by this point in a typical year, but we know the basement will flood when it does rain. So, the smart thing to do at this point is make a proper pit for the sump pump. 


I started off by digging an eighteen (18) inch deep pit in the far corner of the basement.


Then I knocked up a topless and bottomless (!) box that is about sixteen inches square. The box is made from 2" x 12" pressure treated lumber. 


In the next photo you can just about see the box in situ. I had to fiddle about (!) a bit to get it level:


This is the view after a second identical box has been placed on top. The plan is that the concrete floor will be flush with the top of the second box, so for now it protrudes about six (6) inches above the dirt. I will be installing the sump pump and the discharge pipe at the first hint of rain...


So, with that done, on with the show! In the next photo you can see the first section of the concrete we installed at the left, and the most recent section at the right, with a gap between them.  The obvious difference is the more recent section extends much further up the original foundation. This is based on advice I received from a contractor friend who came by to check on my progress. The extra concrete means I can make twice as many attachment points with the rebar. Basically, when in doubt, make it stronger.


This is best illustrated in the next photo where two (2) rows of rebar protrude from the original concrete: 


This later after the forms have been constructed...


Later still and the mixing/pouring operation is in full swing...


tune in again next week soon for another scintillating installment!

Tuesday, November 23, 2021

Guitars part three

More guitars? Really? Well, yes, just one more. For now, anyway. I wrote in part two about how I spent a while looking for the perfect Stratocaster, and ended up with a '52 Telecaster reissue instead. The Tele is a beautiful guitar that has seen a lot of playing time over the last few years, but I have still been on the lookout for the right Stratocaster. My dream guitar would have been David Gilmour's legendary Black Strat, but I was outbid by just under USD 3,975,000 when it came up for sale in 2019. The Fender Custom Shop made replicas of this guitar which even included the wear marks, but even these instruments are outside of my price bracket. Fortunately a resolution presented itself...

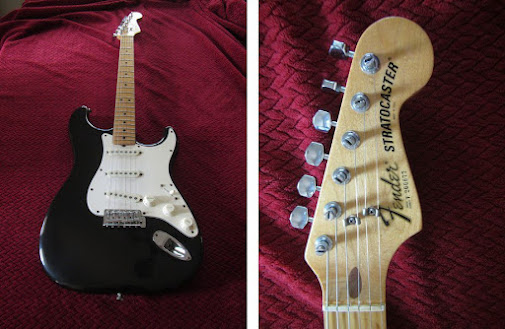
(14) Fender Stratocaster 1982

The solution was the 1982 Tuxedo Black Stratocaster I found online in September this year. After Leo Fender sold his company to CBS in 1965, there was a gradual decline in the quality of guitars produced. It's well documented that the upswing began with the 1981 hiring of several key staff from Yamaha, including director of marketing Dan Smith.

The revamp that followed these appointments led in late 1981 to a new model named the Standard Stratocaster. While retaining the CBS-era larger headstock logo, the guitar reverted to four neck bolts from three, introduced a new “hotter” X-1 pickup in the bridge position and returned to body end truss rod adjustment (no more bullet). In 1983 the guitar was revised again by moving the jack plug onto the pickguard and removing one of the tone controls; the CBS 70s style headstock logo was also dropped in favor of a smaller, silver design which was used until 19871.

The 1981-83 version of the Standard Stratocaster has come to be known on the interwebs as the “Dan Smith Stratocaster”, even though Smith wasn't involved in the design and his name does not appear anywhere on the guitar. Unlike the earlier Stratocasters, guitars from this era are still affordable, and can only appreciate in value.

This particular Stratocaster has a tuxedo black finish which is in excellent shape. The vintage neck is VERY comfortable to play, and the guitar sounds fantastic through my Orange amp. It also came with the original hard shell logo-embossed case, shop tags and owner’s manual. Still, as you may notice from the photo on the left, it has one minor detail which is not ideal.

Samuel Sheep and I had a plan to fix the "imperfection" which started off with pulling off the strings, disconnecting all the electronics and getting rid of the white (elephant) pickguard:


Then we reassembled the electronics with a brand new black pickguard instead, and I had Sam put on new strings and tune it up. It's actually quite tricky to get this guitar in tune.


Sounds mega!


Still wanted:

Gibson Les Paul standard (cherry sunburst)

Rickenbacker 4000 bass (blue, maybe red)