Tuesday, December 3, 2024

351 Windsor Valve Spring Replacement

To recap, the '68 has been off the road for about five (5) months while I have been trying to figure out why the engine was making such an awful noise, when running that is...

I discovered from my leak down test that cylinder #5 was leaking air through the exhaust valve. Or to put that another way, the exhaust valve was not closing when it should do. The next step is to find out why. I used a valve spring pressure tester to compare the spring at the #5 exhaust port with the other springs and it was much weaker. Conclusion: damaged or broken valve spring.


I didn't have a clue what spring to buy, but luckily I do have the original invoice from Summit Racing  from when I bought all the engine parts back in 2014.....so I dug that out and ordered a replacement spring. Which was out of stock....grrr...


While I was waiting I acquired a valve spring compressor from the same BAMA buddy that lent me the leak down test kit and the tool for assessing the spring pressure. I live by the rule: if you need it once, borrow it; if you need it twice, buy it. I'm lucky to have friends that have a lot more specialist automotive tools than I do and are willing to let me borrow them occasionally. 

valve spring compressor

valve spring being compressed

After installing the new spring I adjusted all the valves, put the covers back on and installed some new spark plugs. Then I discovered that one of my plug wires has been destroyed by heat from the headers:


While I was waiting for the replacement plug wires to arrive, I decided it would be a good time to change out my export brace. The new-to-me version is made of much thicker metal, which is difficult to discern from photos. It should stiffen the engine compartment and improve handling. I also plan to have subframe connectors installed, which should give a massive handling improvement, but I need to get the car running again first. 


Getting the export brace out is a bit of a palaver...the shock absorbers need to come out first, but to get them out you have to put the car on stands and take off the front wheels. And another thing: I zinc-plated as much of the Mustang hardware as I possibly could way back when, including the shock tower caps....but the finish on these pieces did not come out well. At the time I just installed them anyway:

This time around I replaced them with chromed-plated caps that I bought from NPD. This looks much better and was well worth the extra $$$: 


The following weekend my new set of plug wires had been delivered. The new wires have 135-degree angled connecters instead of the straight ends I had before, which should be easier to keep away from the headers:


After that, I tried to fire up the car and....no dice! The starter was spinning, I was getting spark, and there was fuel in the float bowl...so it must be compression. My first thought was that the valve adjustment was off, so I had a friend who knows what he's doing come by and have a butchers.

For this engine, which is a 1969 Ford 351 Windsor, the valve adjustment is three-quarters of a turn past the position where the push rod can still just be manually rotated when the cylinder is at Top Dead Center (TDC). It follows that the crankshaft must be appropriately rotated between each valve adjustment. While there was a tiny bit of play in one or two valves, they we pretty much spot on. Next we pulled the distributor and tried spinning the oil pump shaft with an electric drill. (Note: the drill must be in reverse). This is where it got concerning because instead of oil being pumped through the push rods there was....nothing! Oops...no oil pressure! This was confirmed at the instrument panel where there was no needle movement with the ignition on:


The simplest explanations for a complete lack of oil pressure include a bad oil pump, a blocked oil pickup or a pickup that is damaged such that it is easier to take in air instead of oil. So....I removed the crossmember, dropped the steering, pulled the mini starter and with all that out of the way I could drain the oil and drop the pan. Luckily it was the day after Thanksgiving and Terry Sheep was in town to lend a hand, pass me tools and wipe up spilled oil etc. We installed a new oil pump and pickup which I got from Summit - you can't beat their overnight shipping: 


After that I refilled the sump with clean oil and.....still absolutely zero oil pressure. This indicates a serious blockage somewhere in the engine which is clearly bad news. The next step is to pull the oil filter and have a look inside. Before that we had to (again) drain the oil, and this time there were several sizable chunks of metal that flowed out with it:


The same metal fillings on a paper towel:


I pulled the oil filter and left it to drain out overnight:


The next day I used a tool I just bought to cut open the oil filter. To be honest, you could quite easily do the same thing with a regular can opener or even a cutting wheel if you were careful. But I never miss a chance to buy a new tool if I can help it!


This is the snail, out of its shell, so to speak:


A mixture of fine metal fillings and even a fleck of red paint were found inside most of the folds:


A sample of filings transferred to a paper towel:


The next question is this: do I pull the engine and transmission in one piece, or do I disconnect the transmission from the engine first? I won't be able to get the engine onto my stand with the transmission attached. Watch this space to find out!

Thursday, November 21, 2024

Dining Room Cabinets & Bookcase Part 9

I'm using Rubio Monocoat to finish the bookcase, which I also used on the cabinet:


Did the shelves as well...


Came out nice:


Installed in the dining room on top of the cabinet:


Filled with books etc.

Wednesday, November 13, 2024

New Oven

It's been five years since we remodeled the kitchen - at the time we didn't replace the oven. The one we had looked old fashioned, but it was fully functional so we kept it. Even though it has carried on working all this time, it turns out that this may have been a false economy.

Here's why: The old oven was hard wired into a 220 Volt/50 AMP electrical circuit. And, while the new one is also 220 Volt, it comes with a plug and only requires a 20 AMP circuit (i.e. 40 percent of the power of the old oven). We use our oven a lot, so the cost of running an older appliance for five years would probably go a long way towards the cost of a new oven, if not cover it entirely. Oh well...

Converting the hard wired connection to an outlet at the back of the cabinet was straightforward, and I replaced the 50 AMP breaker at the panel with a 20 AMP breaker. This way I don't have to replace the cable between the kitchen and the circuit breaker panel. 

The other difference is that although the new oven has the same interior space, it comes in a much smaller package, which means the opening in the kitchen cabinets needs to be reduced. I started by building some blocks for the oven to stand on - the appliance will be aligned at the top and center of the existing opening:


I have a lot of scrap walnut plywood kicking around in the workshop, so this was a good opportunity to use some:


The next step is to glue supports at the base and sides of the opening to which the new edge pieces can be attached:


Same at both sides:


Next step is to add the sections which will be visible, which were mounted flush with the existing cabinet front:


The next picture is later after the glue has cured, small gaps have been filled with automotive body filler and the the face frame has been sanded to 220 grit.


Rollered on some primer...


...and two layers of top coat:


With new oven installed:

Friday, November 8, 2024

Teething Problems with the '67 F250

I had some super gnarly dental surgery a few days after I got the F250, so it was a couple of weeks before I had a chance to do anything other than look at the truck. Then, on a Saturday morning about three weeks ago, I went out and tried to start the truck....and it was dead! This was unexpected because I had driven it almost 300 miles without any problems and the battery should be fully charged. I had a go at jumping the truck from the RAV4 and it started right up. After letting it run for 20 minutes or so I drained the oil, changed the oil filter, and refilled with new oil. Then I left the battery to charge for a bit and went on to the next thing.

When I came back a few hours later the battery was fully charged and the truck was.....still totally dead! And what's more, this time it obstinately would not start with a jump from the Toyota. Oh dear, oh dear oh dear. 

So, not the battery, but pretty clearly an electrical problem of some kind. Which is not that surprising really, given the electrical system is supposedly 50+ years old and all the visible sections are crusty to say the least. I'd like to say that I traced the problem to a bad starter solenoid and corroded battery cables within a few minutes, but it did take a while longer than that. If you're not familiar, the starter solenoid connects the battery to the starter motor when the ignition key is turned.

the starter solenoid mounts at the left side of the engine bay

I replaced the starter solenoid, and I made two (2) new battery cables because I already had some #2 gauge cable and hardware left over from re-wring the mustang, and I already bought the crimping tool. 

I only had black cable so I wrapped some red electrical tape around the positive section. At some point I will probably replace the entire wiring harness...


I also installed a battery hold down strap, which the truck didn't have when I got it (!) As you can see from the next photo, I am not heading down the classic restoration route with this vehicle. I'm not going to worry about keeping everything looking stock, functionality is the priority. After this was all done, the '67 started up at the first turn of the ignition key! 


I couldn't fix the lock at the passenger door so I decided to change the lock barrels at both doors and at the ignition. I also swapped the miniature air cleaner for one I had at the back of the garage; this one came off the mustang back when it had a six cylinder engine, so I've been storing it for a while. I had to take off the "200 ci" sticker since this truck has a 352 ci V8. 


I also installed the "O" at the front of the hood and added the proper fasteners to the other letters. The previous owner told me he was planning to install the "O" with superglue, but (fortunately) he did not have time...

What's next? Well first of all I need to make a few trips to the city dump. The garage and the back yard are overflowing with crap that I need to get rid off. After that, the radiator/fan shroud needs a serious re-think. I also need to get the turn signals and horn working and do something about the sloppy steering...watch this space!

Tuesday, November 5, 2024

New Garage Door

We've needed to replace our heavy solid-wood vehicle door since we moved in almost seven (7) years ago. The automatic door opener crapped out a couple of years ago and since then it has been manual operation only. Finally I could stand in no more!


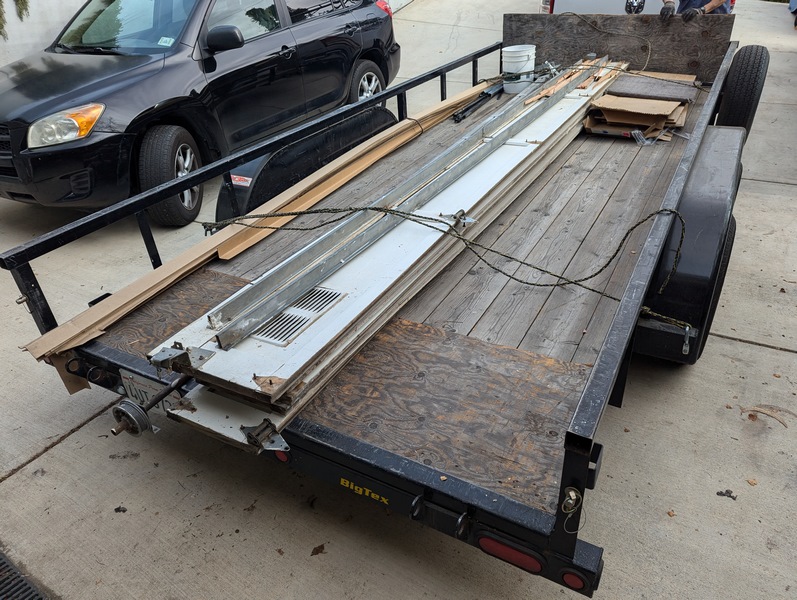
We had to get up early on install day because I needed to get the mustang out of the garage....and it wasn't running at the time. I know from experience that I can't push the car up the hill, so I enlisted Amy Sheep and between us we used the RAV4 and a thick rope to tow the mustang out to the street, and then rolled it in behind the truck. The new door comes flat packed on a big trailer:


First step is to move the new parts into the now empty garage. Then the old door and all the rails were removed and loaded onto the trailer. 


After that I left it to my installer and he did a fantastic job:


The automatic door opener is tucked into the corner of the garage, so there is no central chain or any of that nonsense to bang yer 'ead on.

Saturday, November 2, 2024

Guest Room Remodel

I think I mentioned that Quinn Sheep moved out to UCSC. What I didn't mention was that Samuel Sheep took over Q's old bedroom quicker than a fart moves through a vacuum. Which means we've finally got a space we can make into a proper, grown-up guest room. We started with repairing the walls and going through the usual color selection process...there were a LOT of pin holes to fill.


The most interesting part of the makeover was the closet doors. I started with a coat of paint, but what we really wanted to do was change the hardware.


This is a picture of the new door "pull" from the back. I need to cut a recess into each door for the pull to mount into.


The first step it to make a template from plywood. I drew a rectangle and used a 5/8" Forstner bit to drill appropriately radiused holes in each corner; the edge of each hole just touches the perimeter of the rectangle.


Excess material was cut away with a jigsaw...


After minor adjustment with a file the pull is a perfect fit:


The next step is to trim the plywood template so that the hole is precisely in the middle. This is important for avoiding mistakes when aligning the template on the closet door. 


I used the hand held router to gouge out the recess in each door. This wouldn't work very well with anything other than a solid door...


After installation and re-hanging doors....I did the doors at Cameron Sheep's bedroom closet at the same time.


This is how the new guest room came out. We still need to get some artwork hung in here...