Wednesday, November 23, 2022

Driveway Remodel Part 3

As mentioned in Part 2, the driveway remodel has had some issues with the weather. However, this was the sky the night before the plastic sheeting was removed from the wall. I'm writing almost two weeks hence, and it has not rained since.

This is how the wall looks about a week after it was poured:


By this time the blocking and the forms have been removed from the rear side of the wall and it is time to backfill.  


The landscape fabric goes in first...


This is followed by drainage rock, the perforated drainage pipe, and more drainage rock. 

This is the last photo of the original driveway, taken right before I left for work:

By the time I got back, the concrete was gone, the juniper had been ripped out and the first load of road base had been spread:


This is later after most of the road base has been spread out.


The road base is then heavily watered and partially compacted with the Bobcat.


Its difficult to see in the next photo, but string lines have been set left-to-right across the driveway. This helps to identify low or high points in the road base.  Any such areas are marked with spray paint and modified accordingly.


The final step is running a compactor over the entire area which provides a very solid base for the concrete:


The next step is to install the drainage system in front of the garage. The old drain was just a channel in the concrete that never worked property; the front of the garage would flood under the slightest provocation.


The new drain consists of one (1) meter long precast sections which are designed to lock together and provide a consistent 2% slope towards the preexisting subsurface drain. The sections are set on concrete piles. Doing this ahead of the main pour ensures a precise position. Cast iron grilles will be installed later.


A few days later and the rebar has been installed at two foot centers; at this point the rebar is laid on top of the road base. 


We ripped up the juniper but the trees next to the garage have been given a reprieve. 


The new concrete will extend to the path at the front of the left side gate. The concrete path beyond the gate and the concrete patio in the backyard will be replaced later, with anything but concrete!


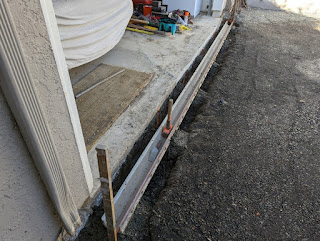
The final preparations before the pour include installing a foam strip at the junction between the wall and the driveway - this is just about visible as the black ribbon in the photo below:


The rebar is lifted onto two inch dobies (small concrete blocks) at the last minute - once lifted, the rebar presents a serious trip hazard.


To be continued...

Wednesday, November 9, 2022

Driveway Remodel Part 2

More progress on the driveway! This is the scene on the morning of Day 8, after two days of rain which has turned the whole yard into a mud slide.


There is about a foot of standing water in the bottom of the footing. It carried on raining on and off during the day, but not enough to stop work completely


 By mid-afternoon the blocking behind the wall was complete...


And at the end of the day the electrician came by to install the conduit which will go inside the wall and the recessed boxes for the lights. You can just about see this in the next photo, parallel to the rebar:


The next day the weather was nice enough to complete the driveway side of the form and install the blocking at that side.


Then it was a case of rain rain, and more rain....for the next three days...


We had our pour scheduled for first thing Monday. It was a bit nerve wracking on Sunday when it was still tipping it down with rain, but in the event it was dry when it mattered. 

The crew started rigging up at 6:00 am when it was still dark, and the first concrete truck pitched up at 7:00 am. The process starts with pumping concrete into the base of the footing and works up hill. 


Then it is on to the wall. ..


All the concrete was poured by 9:00 am. It took three trucks and twenty four (24) cubic yards of concrete to pour the footing and the wall. Time fort cuppa tea.


The finishing process starts as soon as the last concrete truck leaves. Stripping the forms on the day of the pour enables the wall to be finished to a much higher quality, but is fraught with danger: strip too soon and the concrete will fail!  Not many contractors would strip a wall this size on the day of the pour, but the guys from Veteran's Concrete don't take any prisoners!


The excess concrete is cleaned off the forms; some of the lumber will be reused for the driveway and entrance path.


The next photo shows the contrast between the finished section of the wall and the upper section which has just been stripped:


There was just enough time to finish the face of the wall and construct a basic structure to support some plastic sheeting...


Before the heavens re-opened:


Now there is a footing below the standing water:


To be continued.....

Monday, November 7, 2022

Principal Suite Revamp Part 1

If you're expecting an update on the Driveway Remodel, then you're early! Besides, I'm not, personally, or individually, lifting a finger on that particular project. Instead I've been continuing the quest to rid the interior of the house of 1980's era chintz.

This never ending journey has most recently arrived at the principal suite where the bathroom lighting fixture has to go.  Once more I do not have a proper before photo of the bathroom cabinets and the gaudy lighting fixture, but since we have the same setup in the hallway bathroom, I snapped a photo of that instead. About two-thirds of the bubs have been removed to reduce the brightness. 

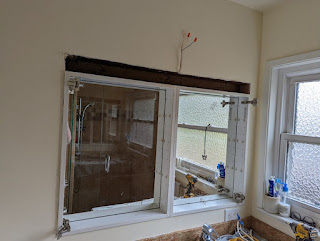
The cabinets are probably not what we would choose, but they do hold a lot of stuff, and they are in decent shape, so they're staying. The lighting fixtures on the other hand need to do one. This is back in the principal bathroom after the cabinet doors and the front panels at the lighting fixtures have been removed. The cabinet doors are mirrored on both sides, and the interior panels are also mirrored, so there was no avoiding looking at myself while doing this project. 


Somewhat unsurprisingly the whole thing is "one piece" so I had to pull the cabinets out of the wall in order to detach the lighting fixtures: 


There was not a whole lot of insulation in the wall cavity (so just like the rest of the house...), and whoever installed the cabinets didn't leave any blocking at the sides of the opening. 


This is how the cabinets will look when they go back


Appropriate blocking was installed to the sides of and above the cabinets and then I re-installed the cabinets a damn sight more securely than the last person did.


Patched the hole in the drywall...


Marked the location for the new lighting fixture:


Re-plastering in progress...


Moved into the bedroom.  The "headboard" wall has just one (1) outlet in the center, which means plugging in lamps and cell phone chargers requires extension cords and is generally a bit of a drag.  

This is a bit later after I cut holes for new outlets and a channel to thread the new cable through. I cut back the existing cable so that it comes from the right side, rather than the center, of the wall.


All buttoned up! I saved the pieces of drywall so that I could put them back where they came from; this saves a lot of time.


The upper outlet is easily accessible, and has the modern USB connections as well as the typical 110 V.  The lower outlet is controlled by the switch adjacent to the upper outlet. This way a lamp can be plugged in to the lower outlet and controlled from the switch with minimal effort. 


The big picture:


Re-plastering in progress...

To be continued....