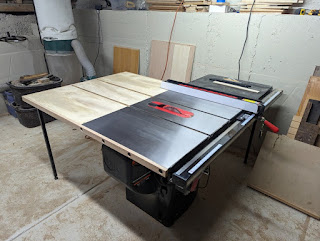
I love my cabinet saw, but what I really need (next) is an outfeed table. I'm not sure if Sawstop sell outfeed tables, because I didn't bother looking - why would I, when I can make one myself using the Alm Fab design you can see on YouTube. My table is based on this design, only it is bigger, made of thicker material, and has two integral support legs.
The outfeed table is constructed from two pieces of 30" x 44" plywood which is just less than 3/4 of an inch thick...for a total of a bit less than one and half inches. I cut one piece very accurately, and then used a flush trim bit on my new handheld router to make the second panel exactly the same size. I also used the router to make two 3/4 inch wide groves in the top panel, which align with those in the bed of my saw.
The next challenge is to make a timber baton which will attach to the angle bracket at the rear of the cabinet saw:
This piece also sets the height of the outfeed table. I used a combination of the saw and my new jointer to mill this piece from a kiln-dried 2" x 4".
The plans call for 3/4" oak trim at the perimeter of the plywood panel, which I didn't have on hand and didn't want to buy due to the astronomical price of materials right now. Instead I poked around on my wood rack and found some 3/4 inch tongue and groove oak floor boards that were left over from a repair at a house I don't own anymore.
I trimmed off the tongues on the cabinet saw, and then I took the boards over to the jointer and made the de-tongued edges square.
Then it was back to the saw to trim the boards to the appropriate width. Easy as pie!
I bough a pair of adjustable support legs and attachment brackets, and all the hardware, directly from Sawstop. This means that the legs will match those on the saw side table and also be easily adjustable. I cut recesses in the second sheet of plywood to accommodate the brackets:
I used the long level to get the leg adjustment perfect...
....and then I installed the final piece of oak trim at the outer edge:
The outfeed table is attached to the saw via the baton I described above...
...and with recessed bolts into the side table through pre-exiting holes.
There is a 3-bolt connection at each of the support legs.
Finished outfeed table, after wiping down with furniture polish:
Same saw, different angle!
Coming Soon: Video tour of the Papa Sheep Workshop™


No comments:
Post a Comment